|
|
|||||||||||||||||||||||||||||||||||||||||||||||||||||||||||||||||||||||||||||||||||||||||||||||||||||||||||||||||||||||||||||||||||||||
|
|
|
|
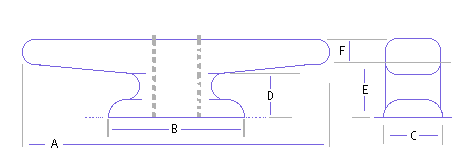
Clearance |
Height |
Thickness |
|
|
|
|
|
|
|
|
|
|
|
|
|
|
|
|
|
|
|
|
|
|
|
|
|
|
|
|
|
|
|
|
|
|
|
|
|
|
|
|
|
|
|
|
|
|
|
|
|
|
|
|
|
|
|
|
|
|
* Extrapolated from other size cleats. |
|||||||
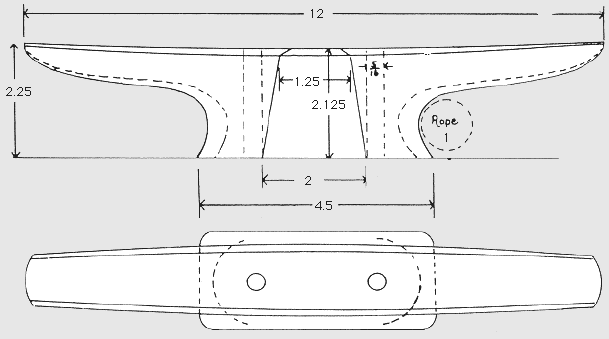
This diagram is based on a cleat in Vince Gilpin's great little book The Good Little Ship. The book deals with small yacht, "low-tech" cruising from the 1940s perspective and has a great deal of interesting material about Commodore Munroe's boats, like Utilis and Wabun. The dimensions are based on the line diameter. I give examples; work the rest out yourself. The dimensions aren't critical. For the 1/4-inch cleat I have given a second set of dimensions to the nearest 16th inch, which is pretty much how I'd lay it out.
|
Line |
Decimal |
Center Height |
End Height |
Horn Length |
Base Length |
Bottom Width |
Top Width |
|
|
|
0.125 |
0.25 |
0.28 |
1.44 |
0.5625 |
0.25 |
0.156 |
|
|
|
0.1875 |
0.40 |
0.42 |
2.15 |
0.84 |
0.375 |
0.234 |
|
|
|
0.25 |
0.531 |
0.5625 |
2.875 |
1.125 |
0.5 |
0.3125 |
|
|
9/16 |
10/16 |
2-14/16 |
1-2/16 |
8/16 |
5/16 |
|||
|
|
0.50 |
1.0625 |
1.125 |
5.75 |
2.25 |
1 |
0.625 |
|
Work out the bolt hole sizes to suit: Gilpin suggests 5/16-in for 1" line.
(From G.R.G. Worcester)
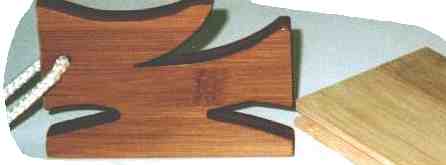
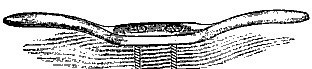
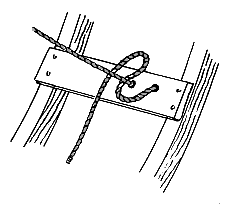
The diagram shows a detail of a certain style of junk with a removable foremast. A clever set of grown knee thwarts supports it. But the interesting item is numbered 6; it turns out to be a movable cleat. Using this as a model I carved one of my own from a sample piece of laminated bamboo flooring I had. Yours really should be larger than my experiment, maybe 8 inches by 5 inches.
Here's the cleat, actual size being 6 inches long. The light colored item on the right is a piece of 'raw' laminated bamboo tongue & groove flooring.
From Tiphys' Practical Canoeing:
|
|
|
Paget's Patent Rocker Cleat "They hold with one turn, but are clumsy looking, and, large or small, are all made for one size of line, that is, blind cord." |
|
|
The "Sunflower" "...sold for blinds. I don't know its trade name. It must be fixed with its head toward the strain, and one turn will hold anything if the pull is steady." |
 |
|
"Now for home-made cleats. As good as anything are well-made ash cleats, which anyone can make for himself. Each cleat should just admit the line to jam between it and the deck. They are light, and like the leather cleats, they do not injure the hands or the paddle that happen to come against them." |
 |
|
|
|
"Mr. McGregor (Rob Roy) invented leather cleats. They are very good for light work, such as a mizen brail. They are simply stout leather cut to shape and screwed with two brass screws to deck." |
|
|
|
"Several of the Royal Canoe Club canoeists have home-made brass cleats, made of a strip of stout flat brass, filed round at the corners and ends, bent up a little and screwed to the deck." |
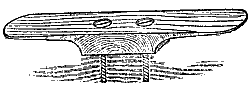
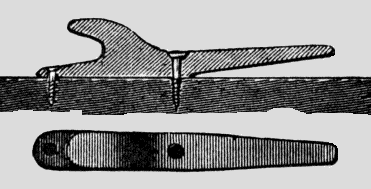
From Dixon Kemp's Manual of Yacht and Boat Sailing:My all-around favorite cleat. If you make them by hand (no power tools) they'll all come out slightly different. That doesn't bother me.
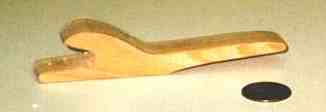
These are attractive cleats invented by Paul Butler, a top sailing canoeist of the late 1800s. I've carved them in cypress, locust, ash, cedar, tulip poplar, pine, cherry, pawpaw, swamp white oak, walnut, and osage orange so far, both by hand and using a bandsaw and a sander. It's a nice way to get to know different woods. The originals were cast. Butler used aluminum for lightness. I simply made a xerox of the size I wanted, cut the side and top patterns out, and glued them onto plywood. Instant patterns.
Here's one of my Butler cleats in cypress. It has yet to be shaped to conform to the top view, above, so that it narrows toward each end. Actually, you don't have to narrow it at all and I have a few which are that way. This is one of the bandsaw-and-sander versions. The round thing is a quarter to give you an idea of its size.
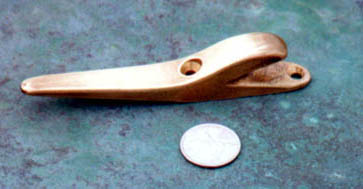
Jim Reineck, who makes wonderful bronze blocks and fittings, liked my carved cleat (it was beech) and used my pattern for these in bronze. Here are photos, just a little smaller than actual size (the disk is a quarter).
They are available special order from J.M. Reineck & Son: his web page is here.
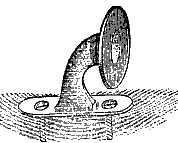
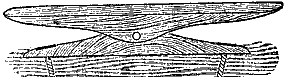
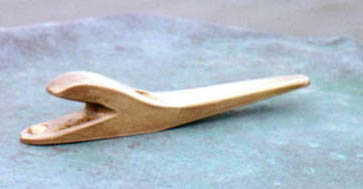
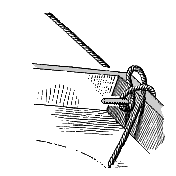
Sailing canoes of the late 1800s were sailed with the sheet on this jam cleat. The sailor used his sliding seat to keep the boat upright but capsizes were expected when racing. It's good for smallish lines such as tack downhauls, snotters, jib sheets, etc.
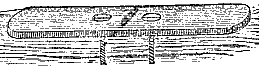
From Marlinspike Sailor:The book The Marlinspike Sailor is pretty good if you like tying knots but the best part are the patterns for assorted cleats. This shows the jam cleat from the book. I've made them but in a slightly smaller size, about 75%, simply by making a couple paper patterns on a xerox machine, gluing them onto 3mm plywood and shaping them into templates to trace around.
I've also made a variation on this cleat which isn't tapered when seen from above; it's about 5/8-inch wide from its nose to its tail. I did this because I had some material which was tall enough, but not wide enough.
I've just made seven or eight of these from cypress scrap to practice my mass bandsawing techniques. They are quite easy to make. Use a rattail file to make the flutes on the sides. A bandsaw and a disk sander make it easy to churn out a load of these, but they can be done by hand as well, and it's a lot more relaxing.

 Shroud
Cleat
Shroud
Cleat - Uncle Billy says: It's the name of a fisssssh... (you know, I really should take a picture or two of my shroud cleats). Maybe I can find a picture.
- Rocker
Cleat
- This one is from Conor O'Brien, the Irish yachtsman.
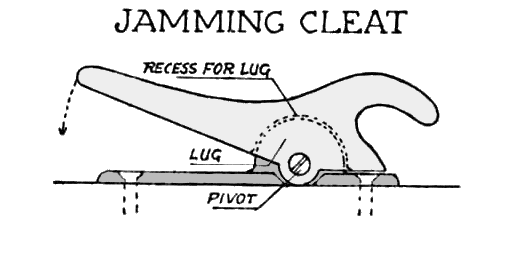
Something like a Butler cleat but the added complication
is a pedestal and a pivot. Good for you home bronze
casting enthusiasts.
-
- "... the semicircular lug on the base plate should be a good fit in the slot to check sideways movement and wear... The pivot must be removed to get at the screws holding the base plate; if it is screwed in from the left-hand side, as shown, it will not unscrew itself."
-
- E.G.
Martin's Cleat
- Another from Conor O'Brien, which he got from a
fellow named E.G. Martin. According to him, the advantage
of this cleat is that you have three screws or bolts,
making it more secure; you can have two in the middle if
the cleat is quite large. The long base spreads the
loads. The horns slope down, which doesn't affect the
operation of the cleat but keeps it from snagging things.
And finally, the enlarged 'throat' means you can use it
for snubbing and surging a line, though I suspect that
this is only a plus on your basic 60-foot cutter. Conor
says:
- "If there is no limit to the length of the cleat it is good plan to bore a hole the size of your rope through the middle of it -- not to haul the rope through, but to make its end fast. Then you can see if it is fast which you cannot do if it is supposed to be hitched in some remote and casual place."
 What!
They didn't have cleats! (Well, they did...) A slightly
bent branch lashed down through the deck boards, with a
small chock under one end. They also used the lugs (ends
of thwarts) that protrude through the hull on sewn-seam
boats as a sort of horizontal bollard.
What!
They didn't have cleats! (Well, they did...) A slightly
bent branch lashed down through the deck boards, with a
small chock under one end. They also used the lugs (ends
of thwarts) that protrude through the hull on sewn-seam
boats as a sort of horizontal bollard.
- Cleatin'
the Sheet
- Everyone says you don't cleat the sheet. Or do you? A pin or a cleat is a handy way to snub off a sheet so you don't have to pull directly against the sail all the time, just by wrapping the sheet in a 90-degree or 180-degree turn around it. I've also noticed on the Bolger Peero that the boat sails itself better in light to moderate winds if I cleat the sheet and luff up with the tiller than if I'm moving the tiller and the sheet at the same time. The boat's probably better at sailing than I am since in light air it's unlikely to be impatient!
- Technically I guess these aren't cleats so much as variations on a belaying pin, but they all come from historical sources and they're something to consider for your boat. The end of the sheet is free and one good tug will loosen it to allow the sail to luff, avoiding a capsize. Otherwise the pull on the sheet holds the bight of line fast.
This isn't quite as nutty as it sounds, since racing canoes were sailed with the sheets set in jam cleats. The skipper compensated for gusts by steering and also by moving in and out on the sliding seat (a kind of hiking board). The Butler Cleat, above, was designed for precisely this situation.
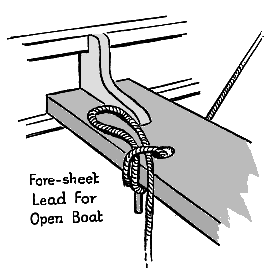
Here's a simple idea. A hole in a seat with a pin beneath. The bow is to the right. I suppose there would be a hole on either end of the thwart.
![]()
Here are two more old ideas:
|
|
|
Hole through a board between frames. (Bow is to the left.) |
|
|
Pin through the
transom, one end on each side. Bow is to the left.
Sheet passes outside the transom, under the pin on
the outside, up, over, and around the pin as shown.
An advantage of this system is that you can sheet
across to the weather pin when you want to pull the
boom in tight to the centerline.
|
|
![]() Back
to the Materials or to The
Cheap Page or to the Top.
Back
to the Materials or to The
Cheap Page or to the Top.